
An effective self-regulating heat cable installation is about more than putting cable on the roof. It creates an automated system that responds to changing temperatures and helps manage meltwater in the areas where ice dams are most likely to develop.
That system includes the cable itself, the controls that help manage when it runs, the layout that guides water off the roof, and the electrical setup that powers everything safely. When those parts work together, your roof is better prepared for Northern Utah’s wintertime freezing and thawing cycles.
Each component plays a specific role in keeping the system effective, from sensing temperature changes to creating a clear path for melting snow and ice.
What “Self-Regulating” Really Means
Typically, heat cables put out the same amount of heat as long as it is on. If you need to turn the system on or off, you need to flip a switch to make the change.
Self-regulating heat cable works differently. It responds to the temperature around the cable and changes the heat output on its own.
When temperatures drop and ice is more likely to form, the cable produces more heat. When temperatures rise, it produces less heat.
Some systems can also be paired with automatic controls that turn the cable on and off based on temperature or moisture conditions. This allows the system to operate when ice dam conditions are present without requiring homeowners to monitor it manually.
That makes self-regulating heat cable a good fit for the freezing and thawing cycles that cause ice dams. Instead of running at the same level all of the time, the system can adjust as weather changes. How much energy it uses depends on the cable layout, roof design, climate, and how often the system runs.
What Goes Into a Self-Regulating Heat Cable System?
The biggest advantage of a self-regulating system is its ability to respond to changing conditions, but that response only works when the entire system is designed correctly.
The Cable Keeps Water Moving
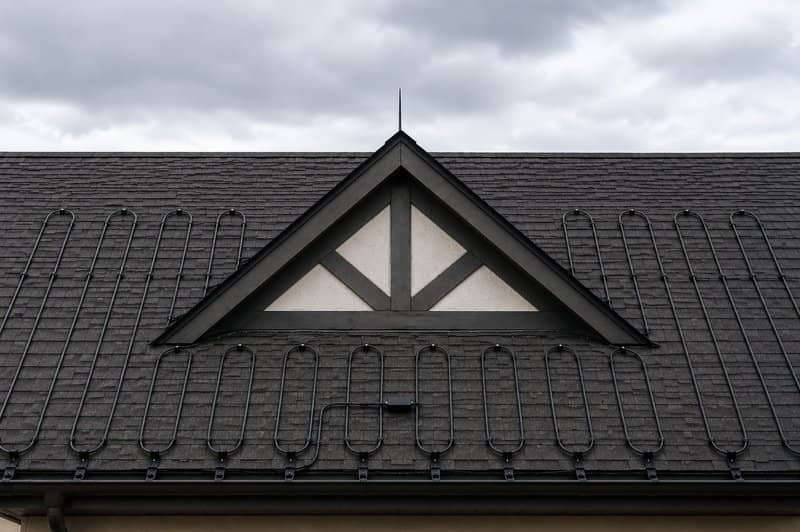
The cable runs along the parts of the roof where meltwater is most likely to collect and refreeze. This includes valleys, eaves, lower roof edges, gutters, and downspouts. The cable sits flat against the surface and keeps those areas warm so water keeps moving instead of freezing into an ice dam.
Self-regulating cable can adjust its heat output zone by zone along its length. A section sitting in a colder spot can produce more heat than a section in a warmer spot. These changes happen automatically inside the cable as conditions shift around it.
The Controller Decides When It Runs
Self-regulating heat cable doesn’t need to run nonstop all winter. The cable and controller work together to regulate the cable, but they do different jobs.
The cable adjusts its output level while it’s running. The controller decides whether the system needs to run at all. When the temperature drops close to freezing, the controller switches the system on. When conditions warm back up, it switches the system off.
Without a controller, the system needs someone to turn it on during cold weather and off again when temperatures rise. That’s not practical for most homeowners. The controller takes that task off your plate.
The Clips Keep Cable in Place
Clips anchor the cable to the roof surface and gutters at regular intervals. They hold the cable in place without creating holes in the roof or shingles. That helps the system stay where it needs to be without creating a new entry point for water.
Different roof types use different clips. An asphalt roof heat tape installation uses clips that grip the shingle edge. A standing seam metal roof uses clips that attach to the seam. Using the right clip for the surface helps the system hold up over time.
Clip quality also makes a difference. Thinner clips can loosen after years of freezing and thawing, while heavier clips hold their grip through those same conditions. When a clip fails and the cable falls out of place, the system stops protecting the area it was meant to cover.
The Guard Protects Against Wear
As the cable runs across the roof and gutter system, it may pass over metal edges or bend through tight spaces. Over time, contact and friction can wear down the cable. A cable guard works like a sleeve that covers the cable at those points and protects it from rubbing.
Downspouts are the one of the most common places for this kind of wear. At the downspout entry, the guard sits between the cable and the metal edge. This keeps them from rubbing against each other through years of temperature changes and movement.
The downspout isn’t the only problem spot, however. Any place where the cable bends sharply or rubs against a hard or sharp surface can be vulnerable to wear. A thorough installation accounts for all of those areas, not just the obvious ones.
The cable guard is a small part of the system, but it can make a big difference. Leaving it out can lead to repairs or replacement sooner than necessary. Installing a guard upfront helps protect the cable where it is most likely to wear down.
Why the Pieces Work Better Together
There’s a difference between heat cable working by itself and a complete self-regulating heat cable solution. A full system includes the cable, controller, clips, and cable guard together. When those parts work together, the system can do a better job protecting your roof from ice buildup.
Placement matters too. A complete roof heating cable installation covers the full path water takes off your roof, including the eaves, rakes, valleys, gutters and downspouts. The cable creates a warm drainage path. The controller runs the system when conditions call for it. The clips hold the cable in place. The guard protects the cable where it’s most likely to wear down.
Each part has a job. When one is missing or out of place, the system has a gap. That gap can give ice a place to build up and cause damage.
What to Ask Before You Schedule
When you talk to heat tape installers in Ogden, ask if the installation includes self-regulating cable, a controller, durable clips, and cable guard. A complete system should include those pieces, not just the cable itself.
It’s also worth asking about the warranty, too. Some installers include a workmanship warranty that covers how the system was installed. Terms vary, so ask what the warranty covers and how long it lasts. The answer can tell you a lot about what you’re actually paying for.