
Ice dams rarely form randomly on roofs. They follow predictable patterns shaped by roof geometry, meltwater flow, and the locations of cold spots along the edges. Heat tape systems are designed around those patterns, and proper placement determines how well the system can work.
Professional heat tape installation targets the specific areas where ice is most likely to develop. Mapping out and covering those areas correctly allows the system to work with the roof’s natural drainage process. And understanding how a full system should be laid out makes it easier to see why installation details are important.
Each part of the roof contributes to how water moves, and the effectiveness of the roof drainage system depends on matching that behavior.
Start With Where Ice Dams Actually Form
A good installation starts with reading the roof. Ice dams don’t form across the whole roof. They develop in predictable spots based on the roof’s slope and shape, how much heat escapes from the living spaces below, and where water tends to pool and refreeze.
The most common problem areas are the eaves (the lower horizontal edges where the roof overhangs the wall), the rakes (the angled side edges of the roof), and the valleys (the V-shaped channels where two roof planes meet). Valleys are especially prone to ice buildup because water from two sides funnels into one narrow path. Once that path freezes, water can back up fast.
Gutters and downspouts are also part of the drainage system, which means they’re part of the problem too. A heat tape system that protects the roof but doesn’t extend to the gutters just moves the freeze point. Water can drain off the heated roof, but as soon as it hits a frozen gutter, it pools there instead. That’s moving the same problem to a new location.
A full heat tape system covers all the potential spots where water can refreeze and block the flow of snowmelt from your roof.
Plan a Cable Layout That Follows the Roof
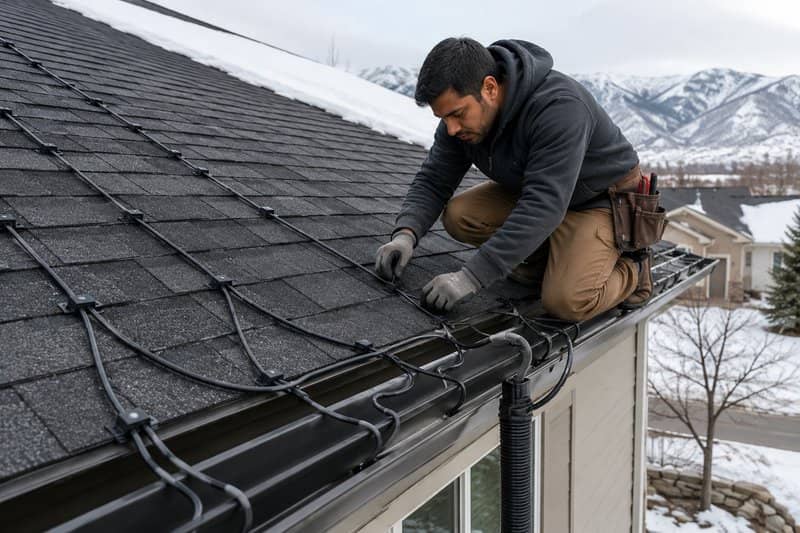
Problem areas must be part of a proper heat cable system. On a typical residential roof, that means four main runs that include:
- The eaves
- The rakes
- The valleys
- The gutters and downspouts
The eave run follows the lower edge of the roof out past the exterior wall. The cable doesn’t run in a single straight line at the very edge because a straight line at the eave edge can let ice form just above the cable. Instead, it follows a zigzag pattern that weaves up into the first couple rows of shingles, covering a wide band of the lower roof.
Rake runs follow the angled roof edges toward the ridge. Valleys run down the center channel between roof planes. DIY installs often skip these two areas because they’re less obvious than the eave, but they’re frequently where ice builds fastest.
The amount of cable a roof needs depends on how long the eaves run, how many valleys the roof has, and whether the rakes are exposed on one side or both. Each roof gets measured before the cable is cut. There’s no standard length that works across different shapes and sizes.
Run Cable Through Gutters and Downspouts
The gutter system is where layouts most commonly get cut short, and where partial installations tend to fail first.
A complete heat tape installation runs cable through the gutter trough and down through the downspout to the ground. This keeps the full drainage path open. Water that melts off the roof surface has a clear route all the way to the ground.
The cable runs down into the downspout and back up, so heat gets distributed across the full length of the pipe. A single pass down the inside isn’t typically enough to keep the bottom from freezing, and the bottom of the downspout is where blockages typically start.
When gutters aren’t protected with heat tape, ice can accumulate and add significant weight to the system. The gutters transfer that weight to the fascia boards, the structure they’re attached to, which can slowly weaken even without obvious external signs.
Use the Right Clips for the Roof Type
Clips are what keep the cable in position. The right clip depends on what type of roof you have.
Grip clips hook under the shingle tab and hold the cable flat against the surface. The cable needs to stay in contact with the surface to transfer heat effectively, so a clip that holds it flush works well. Asphalt shingle roofs make up the large majority of residential installs across Northern Utah, and grip clips are the standard hardware for them.
Standing seam metal roof clips feature a unique design that allows them to clamp onto the raised seam without penetrating the metal. Puncturing a metal roof to attach hardware isn’t an option, so the clip works with the seam profile instead. The clip keeps the cable positioned along the correct line and helps it maintain consistent contact with the surface it’s heating.
Using the wrong clip for the roof type could mean the cable won’t sit properly. Likewise, poor-quality clips can allow cabling to shift over time. A cable that lifts away from the surface it’s supposed to heat loses efficiency at exactly the spots where coverage matters most. Clip selection should be part of the layout from the start.
Protect Heat Cable With Guards
Cable guards protect the heat cable at the spots where it is most likely to rub against corners, hard materials, or rough edges.
The downspout transition is one of these spots. The cable runs down through the downspout and back up, making a sharp bend at the bottom. Every time the cable heats up and cools down, it bends back and forth. Without a cable guard at that point, the outer coating can wear through from friction over several seasons.
And once the coating is compromised, the cable’s heating performance drops. The damage is invisible until an ice dam appears.
Professional installations place cable guards at every known stress point from the downspout transition to the edges of the roof and anywhere else it contacts a hard surface under tension.
Cable guards can help extend the system’s useful life well beyond what a clip-only setup provides.
A Proper Heat Tape Setup
Heat tape is not a one-size-fits-all solution. It only works well when the installation is tailored to the roof’s actual conditions. The ice that forms on your roof forms where it does for a reason tied to the design and construction of your roof. The system that protects that roof from ice damming needs to be just as unique.
When the layout follows the flow of water on the roof, the system creates a coordinated path for meltwater to move safely off your roof.
The difference is consistency. The system either matches the roof’s behavior and keeps drainage moving, or it leaves gaps that cause problems the next time temperatures swing, and ice starts to form.